Tag: GIMP

  • Overdue request but the Mailman is IN

    Introfix

    After much wait and anticipation (more like I completely forgot to release it), TES Arena IntroFix is complete and can be downloaded here:

    http://www.nexusmods.com/tesarena/mods/4/?

    In this mod, I fixed three slides from the intro when you select new game.

    3-Card monte

    I had completed these some time ago but forgot to release them. Unfortunately, my file managment has been less than stellar and it took awhile to find them again. When I did, I noticed that there were still a couple of errors that needed fixing. So I fixed them and now no one need ever suffer under Uriel Septim IV’s oppressive need to steal the limelight from his great grandson.

    Uriel is an odd family name

    INTRO01t
    Uriel Septim VII is rightfully restored.

    Once I had the textures in PNG format (a common image format), fixing the slides was a matter of several well placed cut and pasting.

    However, getting them to a PNG format was more of a challenge. I had to use Arena Toolbox by Dysperia. That tool is a fantastic counterpart to ArenaModdingSuite. One of it’s unique functions is that it can convert the compressed images into PNG. Before this tool, no one knew how to uncompress those images (there are quite a few).

    One hidden feature of the program is that it allows you to import the palette file (where it determines color) into the image itself versus being external to the file in the root directory. To make it work though, you have to trick the program into thinking it’s a new image. Simply adding a letter in the filename sufficed. The Toolbox can also convert back to the native IMG file.

    Last thing left was to test it. I dropped my 3 new IMG Intro slides into the root folder of Arena, booted it up, and IT WORKED. Awesome. Sometimes it’s the little wins that keep you going 😉

    • Martin


  • Picking back up the brush

    Who’s down with ADP…yeah you know me

    After a substantial hiatus for real life, I’m back. My schedule has a lot more free time in it now and I should be able to make substantial progress on the Arena mod in the next few weeks. As of now, I am just 2 or 3 SET files away from reaching ALPHA! Once that is complete, I will be setting up a MODdb page and probably trying to host it on the Nexus mod site.

    The project will stay ALPHA until all door and ground files are done. I do hope to have all the font files and interface done too, but that is more of a nicety (most are already done though). Once ALPHA 2 is out that I will be going back and reevaluating each texture. I started this so long ago and have come quite a ways that some of them are not to my standard or vision anymore. As it is already, I occasionally retool one here and there but I plan to do a comprehensive review.

    Taking the plunge

    I finally gave in and purchased Photoshop (well subscribed really). I don’t anticipate being very proficient in it for awhile since I have been using GIMP for years and it’s so different. For the Arena project, this isn’t really a problem. It doesn’t require fancy functions. I am literally coloring individual pixels from a 256 palette. The biggest obstacle their is my creativity and not the tools.

    Some recent work below (really like how the first one turned out)…

    – Martin

    WALLH MINEA MINEE WALLG

  • Wake up! You were dreaming.

    Early on

    Morrowind Main Menu (Original)
    Morrowind Main Menu (Original)

    Back about 4 1/2 years ago, I had just gotten into computer graphic design. I spent the first 1/2 a year experimenting and learning how to use the editing software (GIMP). One of the games I messed with was Morrowind, my favorite game. It wasn’t really meant for any project. I decided to make a desktop wallpaper of the main menu.

    At that time, I didn’t know much about GIMP or how to use it effectively. Additionally, I had just gotten my Wacom tablet and hadn’t become comfortable with it quite yet. To make it easy, I used the original Morrowind main menu texture as the base. Because of this, the end result was (and still is) useable in-game. I even went as far as retexturing the New/Load/Save buttons to match the theme.

    Morrowind Box Art

    It’s Alive

    I decided to use the box art as a supplementary inspiration when I began working on it. There were some key differences between the two; the major one being the border that framed the box art. I really liked the border and the “daedric” lettering on it. Unfortunately, my source copy of the box art wasn’t very good so I had to guesstimate when recreating them.

    Crayola version

    I did have a couple goals in mind with an overarching theme of applying a cleaner more art-lik

    • To boost contrast, the border was darkened and a similar color was used for the middle triangle.
    • The center was lightened with a complimentary but vivid color to liven up the image.
    • The “daedric” lettering was lightened up to look more dramatic and almost “glowing”.
    • A spot of white was placed on each “letter” and then the smudge tool was used to stretch that white color into highlights.
    • A level of depth was created by adding width and darkness to the inner edge of the frame. The “Morrowind” lettering was giving a simple perspective by adding a drop shadow angling to the lower right.
    • The dragon emblem was subdued so that it didnt’ overpower the wording. This also gave a subtle layer of interest.
    • Lastly, it hard to see but the entire image was given a paper texture filter to create a painted canvas feel.
    I use this as my background on my computer for inspiration
    I use it as my background on my computer for inspiration

    You never forget your first

    Most of these effects evolved through experimenting with the software and various visual styles that I had in mind. However the whole picture was hand drawn/partially traced using my art tablet. It’s not without it’s flaws and a level of crudeness to the picture shows my inexperience at the time. Despite all that, it is one of my favorite personal pieces because it’s the first complete computer graphic design work of mine.

    – Martin

  • It’s getting hot in here AGAIN?

    It’s getting hot in here AGAIN?

    Warm to the touch

    NOTE: This kind of a rehash of a previous post from a different angle (slightly) that walks through the process more “visually”.

    One of the texture SET files edited recently for ADP was a 4 texture wall set that resembled a wall with lava or fire spots. I had already settle on using a mostly flat wall color to more dramatically contrast the flames/lava parts of the textures. But in order to maintain a uniform look to the fire, the image needed to be built in layers. A good first step is to make a duplicate layer of the original before making any changes, especially major ones. That way, the duplicate can use as a reference when editing the image.

    MINEB1 (original)

    • Layers in GIMP (and I’m sure Photoshop) allow you to create/edit different pieces of a picture individually but still be able to see them as a whole…like may layers of tracing paper stacked together but each having a different element drawn on it.

    Cut it out

    In this instance, the first element designed was the “wall” layer. Using the Erase function, all spots containing a decent amount of fire were erased.  In GIMP, the eraser needs to be set to “hard edge” because of the technical limitations of the image format, it can’t deviate form the original palette or be partially translucent. Later on when the “fire” layer was created, it would be placed underneath this layer so that it show through only the holes.

    MINEB1 (foreground)

    Sticking to colors in the image, one was chosen as the new wall color. Before mass painting the “wall” (usually just by increasing the pencil/brush size to larger than the image), the “lock” transparency option had to be enabled to prevent the cutout holes from being filled in. Lastly, another complementary color was used to border the cutout sections and add a smidge of depth and interest.

    Heating it up

    Next, another layer was created for the “fire”. The plan was to fill the whole layer with the fire effect. If the “wall” layers transparent parts are changed (holes made bigger or moved), it wouldn’t need any adjustments. Also, it’s just easier that way. The fire is created by using alternating gradients of yellow to red and then back. This is repeated for the whole image.

    MINEB1 (fire background)

    Lastly, the final step is to “merge” the two layers together so that they show the wall but with spots of fire. In GIMP, you can right click the “wall” layer and just select “merge down”.

    MINEB1

    This technique is very similar to the one used on another firery wall that I completed months ago. Additionally, I used it for the lava in my Minecraft texture pack.

    MINEA1

    It’s fairly simple but still creates that fire/lave effect I like despite the limited palette.

    – Martin

  • Dude, where’s my post

    Slight pause

    Due to a fairly high RL tempo at the moment, I haven’t been able to work on ADP for a little while. I foresee having a little more time by the 2nd week of December. I don’t care for extended delays (well more than a month) so as soon as I can, I’ll be back at it. I’m eager to finish ADP and start my next (on hold) project.

    Who told them?

    I created this website so I can chronicle all my artistic  (and design) endeavors, not just game related stuff. However, I haven’t been highlighting my other artwork. I get asked occasionally by friends to create images now and then.  In that vein, I am going to create a general art section and will similarly list my thought processes and/or techniques behind how I created each image. Additionally, I want to do a retro section of old (some pretty juvenile) artwork from my younger years.

    Up to bat

    I have two non-game related projects in the works right now: an logo and an emblem. The prototype of the logo is below but I only have the concept for the emblem mapped out right now. I’ll detail my work on the logo below soon.

    – Martin

    tigerworking1

  • Time-traveling Emperor?

    On Demand
    Per request, I made a fixed text version of the intro in the original style of the game. I just have to convert it and then I’ll post a link to download it. Of course, ADP will feature the corrected version in the new style also. All I needed to do was a little cut and pasting in GIMP to move the “V” left. Then I copied the “I” and pasted it twice. Voila.
    – Martin

    No more time-traveling great grand-parents
    No more time-traveling great grand-parents
  • Bring marshmellows and a stick…

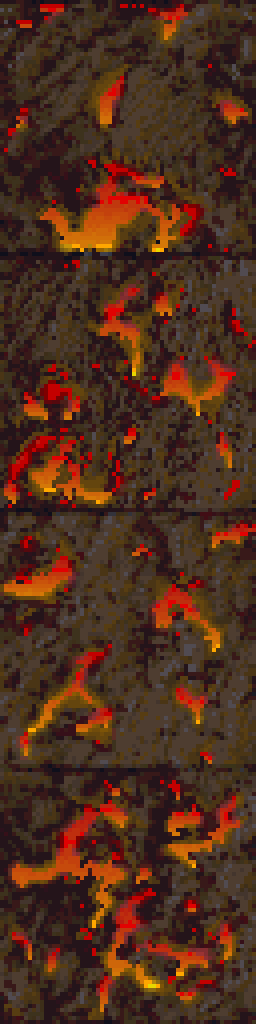
    For this texture set, I wanted to retain the fire/lava vein effect in the walls. Although I had mapped it out from my previous run through all the textures as covered in a previous post, I ended up making quite a few changes. Click the picture below for a closer look.

    Here’s a breakdown of the sequence of events from start to finish.

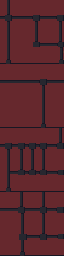
    1. Create an outline – To do this I selected a dark color and outlined all the rocks letting anything outside the outline be designated for the fire/lava. I followed the source fairly closely but did take some liberties to make some a little bigger.

    2. Fill in the rocks – I initially selected a tan color for the rocks since the original was largely tan-ish. I colored in every rock, one by one. There are easier ways but I enjoy it so I don’t mind using the color every pixel method.

    3. Make tiling template – Since any texture in the set could be next to the other, I had to make sure that they match up naturally and didn’t have any obvious seams. I copied the first 3 left-side columns of pixels in the top most texture and pasted them on each image all the way down. Next, I repeated the process but for the right side. This made all 4 textures (this SET is 4 textures in a column) have the exact same sides. Since the top one was seamless, they now all are seamless.

    4. Make duplicate of image in new layer – The duplicate layer is what I used to create a uniform and consistent lava pattern. To duplicate a layer, right-click on the layer in the layer toolbox, then select duplicate layer. An exact copy of that layer will be placed right underneath the original.

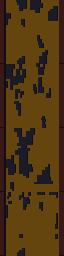
    5. Remove fire/lava from top layer – First, I turned off the bottom layer and make sure the top layer is selected. Then, using the eraser tool, I erased all the fire/lava and miscellaneous areas not already designated as rocks (and thus colored in). This made the lava area transparent but it is still preserved in the bottom layer which is “hidden” from view when turned off.

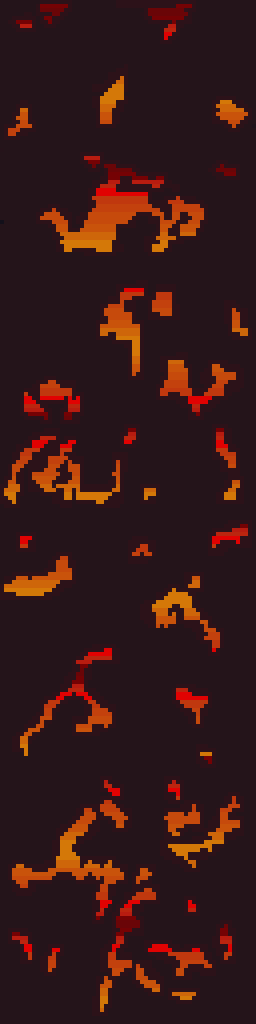
    6. Create lava layer – First, I turned the bottom layer back on and the top layer off. Then I started with the top image and hand created a gradient covering the whole image starting with yellow at the bottom and working to dark purple(ish) on the top. Then I copied this completed lava gradient and pasted it over the 3 bottom images.

    7. Merge the two images – I “turned on” the top layer (making both layers on), then right clicked on the top layer in the layer toolbox. From there I selected “merge down” so the top layer and bottom layer become a single image with both the new rocks and lava together.

    8. Revise – At this point, I decided that the lighter color rocks didn’t contrast well enough or give the lava the pop I wanted. I loaded another copy of the original texture in GIMP, picked out a new brown but then decided on a slightly lighter color than the original rock outline. Using the bucket paint tool, I filled in all the rocks with the new color. In this process, I also caught a few miscolored pixels and fixed them.

    9. Create depth – Next, I added a lighter faded version of the rock color to the left side of all of the rock outlines. This created a highlight and adds the impression of depth to the rocks.

    10. Touchup – Lastly I offset the image 1/2 on the horizontal plane so I can see how the whole file tiles sideways. Since dungeons and interiors don’t exceed 1 tile in height, I didn’t have to worry about this texture set tiling vertically. To offset in GIMP, press Ctrl + Shift + O and in the “X” box typing 32 which is half the total width of the texture. After clicking the “offset” button, the whole image will shift 32 pixels to the right and placed the edges of the image in the middle. I scanned and fixed any mismatchs or slight errors then shifted the whole image 32 more pixels returning it to its original place.

  • Icy walls of bleh

    A little before and after pictures. There are a total of 5 ICE dungeon texture SETS. As you can see in the below images, they are mostly just recolored variants with different symbols. SIDENOTE: I presume they are Daedric symbols commonly seen in later games.

    Here are three of the originals….

    It took a bit to decide how much different, I wanted each to be. Ultimately, I just decided on to make them vary enough so that they would have their own appeal but maintain the overall theme. I haven’t seen these dungeons in game yet (never played far enough I presume). Once I complete all the SET files, I will do a test run through the game to see if I can find them (and others).

    And the same there afterward…

  • Where do I start….

    Design Document

    ARENA DEPIXELIZATION PROJECT(ADP) 

    Texture mod for The Elder Scrolls 1: Arena


    PURPOSE:

    • Create the (first) TES1:Arena texture mod replacing the down-sampled blocky artwork with smoother less pixelated textures that is hopefully appealing and unique.


    GOALS

    • Create a new unique art style for game
    • Improve texture variety by replacing duplicate textures and ensuring that each texture set and image is unique and stands out from the others.
    • Replace all textures.
    • Create a more cohesive theme amongst textures.


    Limitations

    • TES1: Arena is a very old game and uses unconventional file formats and require special programs/methods to open.
    • Most textures are only 64 x 64 pixels (or in the case of SET files, groups of images with those dimensions) and cannot be resized. This limits the amount of fidelity that can be achieved.
    • Textures are limited to a (external) 256 color palette.
    • In game, many textures in the same SET are placed side by side in seemly random order. That means most textures from the same SET (and their door images) have to be seamless with one another.
    • Some textures are compressed in an unknown way that has yet to be deciphered.
    • The game engine assigns textures based on existing INI files for each type areas but the texture sets aren’t matched very well in multi-level areas. Many areas use different texture SETs for each level but they appear almost arbitrary in how they were selected.  It would take meticulous remapping of all the INI files to create more cohesive appearance.


    Resources

    • Hallfiry’s Arena Suite– It is a set of tools that allows bulk extraction and reinsertion of assets from the Global.BSA (Arena’s game asset container file). It also converts all the non-compressed textures into PNG files for easy editing and then converts them back when reconstructing the BSA file.  This program allows me to have one working directory. When I need to test my work out in the game, I just create a new GLOBAL.BSA from that directory and replace the one in the game directory.
    • GIMP – Freeware alternative to Adobe Photoshop


    Steps:

    1. Complete all SET files to have “Alpha” status. (95% complete)
    2. Complete all Wall and Ground IMG files.
    3. Complete remaining IMG files to “Beta” status.
    4. Tweak textures that don’t show well in game or don’t match.
    5. Fix any individual texture errors (e.g. rogue pixels or misaligned textures).
    6. RELEASE 1.0 (not set but likely on Tesnexus and ModDb.
  • Kicking down the door

    Interior doors


    Last week when I was lacking of motivation to work on the walls sets, I decided to fiddle with the interior doors and more specifically the wooden doors. Those are the ones that connect rooms and hallways and not ones leading out of buildings or dungeons. These particular doors are one single texture that is a door (the entry exit ones have borders that match the interior walls). That door occupies one square of dungeon space (all dungeons are square chunks of one texture). While in-game it appears that there are only two or three different wood door textures, there are actually over a dozen. It’s just that there are only 3 different  textures among them. Here’s a sample of one image among multiple IMG files:

    5 Doors don’t have to equal 1

    What I don’t understand is why Bethesda used multiple files with the same IMG when space and memory was a concern back then. They could have easily used one file through the INF files (the ones that decide what textures to use on each level). However, this does give me an opportunity to add some variation to the ingame art. As such, as with walls and etc., I will make each door appearance different.