Why “Marking”
As I have mentioned in previous posts, my experience in working with game art resources has revealed that the game creators often leave behind orphan files that aren’t actually used in the game. It is very frustrating to spend a couple hours on a texture only to not be able to see it in game (as I did many times in for Torchlight texture pack). To combat this waste of time, I have started “marking” texture files so that I can see if they get used in game or not. For example; Arena has SET files (2-6 textures all in one image) and IMG files (single image). I have discovered that many wall and ground sets are repeated in both SET and IMG formats. So a single “Wall” set would have up to 4 IMG files that mirrored that SET file. For any suspect files, I would mark the IMG file and see if it shows in game. Then I could avoid redoing a texture that isn’t even used. In theory, I can save time and shrink the overall pack size by eliminating these orphan files. Lastly, using this process I can find the file in the game to see how it looks when I texture it.


The process
The process is fairly simple. After completing some wall SET files for ADP, I tested them. I could see my new textures in-game so I knew these were correct files. But when I did the same for ground SETs, they didn’t show. So I decided to “mark” the IMG files and see if they were used or not.
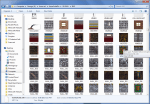
STEP 1: I loaded about 30 IMG files in GIMP at one time (only the ones I was unsure of). Since they are so small (64 pixels by 64 pixels), GIMP could load them without too much trouble.
STEP 2: One by one, I would draw a symbol (nothing fancy) on the texture. I would use a color that stood out so it would be easy to spot in game. I tended to use the alphabet then numbers then symbols so I could narrow them down easily if needed.
STEP 3: Since I have a fancy Logitech keyboard that supports macros, I created a macro that would overwrite the original file then close the file (about 12 keystrokes each). Then all I had to do was hit the macro key a bunch and it would keep executing the macro; saving and closing each file one by one. I managed to do this all in an hour or so while watching a football game.
STEP 4: I would load the next 30 or so and repeat the process until all the textures in question were marked. In all I ended up marking 150 files (all wall and ground textures).

Results
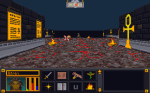
After a preliminary check, I realized that ground textures seem to favor IMG formats (to allow better mixing and matching in levels?) and walls were almost exclusively SET files except for city walls. Out of 150 textures marked, I have so far only found 3 in game. The caveat on that is that I haven’t explored a lot of the game. I will most likely go ahead and texture all the ground and outer city wall IMG files and then check again. But if even half of those are just junk files, it would well be worth the saved time.


Leave a comment